
Når det kommer til valg i Photoshop, er der virkelig to typer mennesker - dem, der ved, hvordan man bruger penværktøjet, og dem, der kæmper. De fleste mennesker udsætter sig for at lære, hvordan man bruger pen-værktøjet så længe som muligt, mens andre aldrig kommer rundt og lærer det, idet de tror, at det bare er for forvirrende, for kompliceret og bare unaturligt.
I sidste ende lider deres arbejde i Photoshop for det, da de sidder fast og stoler på Lasso-værktøjet for næsten alt, hvad de ikke kan vælge med de rektangulære eller elliptiske markeringsværktøjer. I denne Adobe Photoshop-tutorial vil vi sætte en stopper for lidelsen. Vi lærer, hvor nemt det virkelig er at foretage valg med penværktøjet.
Når jeg siger "let", mener jeg ikke, at du vil læse denne tutorial og straks blive omdannet til en Pen Master. At lære at bruge penværktøjet er meget som at lære at cykle. Når du først har lært det, vil det virke helt naturligt, og du vil undre dig over, hvordan nogen muligvis ikke kunne vide, hvordan man bruger noget så enkelt. Men at komme til dette punkt kræver lidt øvelse og kræfter, og mens du læser hver bog der er, hvordan man kører på en cykel, kan du lære dig de grundlæggende elementer i, hvordan pedaler, gear og bremser fungerer, er det ikke, før du kæmper på cyklen at holde din balance i, at den virkelige læring begynder.
En af de store ting ved penværktøjet er, at det ikke er noget, der er eksklusivt for Photoshop. Langt fra! Stort set alle populære fotoredigerings-, grafik- og sidelayoutprogram bruger Pen Tool i en eller anden form, så når du først har lært at bruge det i Photoshop, har du allerede en god forståelse af, hvordan du bruger det i masser af andre programmer så godt!
Hvor finder jeg penværktøjet?
Inden vi begynder at tale om, hvad Pen-værktøjet er, eller hvordan vi bruger det, skal vi se på, hvor vi kan finde det i Photoshop først. Du finder Pen-værktøjet i værktøjspaletten, grupperet i formværktøjer, Type-værktøjet og Sti-valg (den hvide pil) og Direkte valg (den sorte pil) Værktøjer (se billedet til venstre).
Photoshop's penværktøj
Naturligvis kan dette rejse spørgsmålet om, hvorfor hvis vi kan foretage valg med penværktøjet, er det ikke grupperet med de andre valgværktøjer (det rektangulære markeringsværktøj, det Elliptiske markeringsværktøj, Lasso-værktøjet osv.) Hos toppen af værktøjspaletten? Hvorfor er det der nede med de andre værktøjer, der tydeligvis ikke er valgværktøjer?
Det er et fremragende spørgsmål, og der er tilfældigvis et lige så fremragende svar til det, som vi får et øjeblik.
Hvorfor kaldes det "pen" -værktøjet?
En af de første stødesten til at lære at bruge Pen Tool, som med mange andre ting i Photoshop, er dets navn, da det trods alt er en ting, som alle, der nogensinde har prøvet at bruge det, ved, denne ting er ikke en pen. I det mindste ikke den slags pen, du normalt tænker på, når du hører ordet "pen". Prøv at skrive dit navn med det på samme måde som du muligvis underskriver dit navn på et stykke papir med en pen, og du ender sandsynligvis med et snoet, sammenfiltret rod og ting, der går rundt over hinanden (selvfølgelig antager jeg, at kunne meget godt være, hvordan du underskriver dit navn).
 Pierre Bezier
Så hvis det ikke fungerer som en traditionel blækpen, hvorfor kaldes det derfor Pen Tool? Penneværktøjet er faktisk blevet kaldt flere ting gennem årene, og med det mener jeg ikke den slags ting, du måske har kaldt det i øjeblikke med frustration. Du har muligvis hørt det kaldet Bezier Pen eller Bezier Tool, og det er fordi det blev oprettet af en mand ved navn Pierre Bezier (det er ham til venstre), en fransk ingeniør og en smart fyr, der kom op med fancy matematik, der kræver værktøjet, mens du arbejder for Renault bilfirma (Pen Tool blev oprindeligt oprettet for at hjælpe med at designe biler).
Du har muligvis også hørt Pen Tool, der er omtalt som Paths Tool, og det er virkelig det mest passende navn til det. Penneværktøjet handler om at tegne "stier". For at foretage valg med penneværktøjet konverterer vi simpelthen den sti eller de stier, vi har tegnet, til valg. Det begynder dog altid med en sti.
Kortkoder, handlinger og filtre-plugin: Fejl i kortkode (ads-basics-middle-2)
Hvad er en sti?
En "sti" er helt ærligt noget, der kan virke lidt ude af sin plads i et program som Photoshop. Årsagen er, at Photoshop primært er et pixelbaseret program. Det tager millioner af små firkantede pixels, der udgør et typisk digitalt billede og gør ting med dem. Stier har på den anden side absolut intet at gøre med pixels, og det er grunden til, at jeg sagde, at de muligvis synes ude af sted i et program, der hovedsageligt bruges til redigering og tegning af pixels.
En sti er virkelig intet andet end en linje, der går fra et punkt til et andet, en linje, der er helt uafhængig af og bekymrer sig intet om pixlerne under den. Linjen kan være lige, eller den kan være krum, men den går altid fra et punkt til et andet punkt, og som jeg nævnte, har det overhovedet intet at gøre med pixels i billedet. En sti er helt adskilt fra selve billedet. Faktisk er en sti så adskilt, at hvis du prøvede at udskrive dit billede med en sti, der er synlig på din skærm, ville stien ikke vises på papiret. Hvis du gemte dit billede som en JPEG.webp-fil og uploadede det til et websted, selvom du gemte billedet med stien, der er synlig på din skærm i Photoshop, vil du ikke se det på billedet på webstedet. Stier er kun for dine øjne og Photoshop. Ingen andre vil nogensinde se dem, medmindre de tilfældigvis går forbi din computer, mens du arbejder.
Vi har altid brug for mindst to punkter for at oprette en sti, da vi er nødt til at vide, hvor stien starter, og hvor den ender. Hvis vi bruger nok punkter til at vi kan bringe vores sti tilbage til det samme punkt, som det startede fra, kan vi oprette forskellige former ud af stier, hvilket er nøjagtigt, hvordan Photoshop's forskellige formværktøjer fungerer. Rektangelværktøjet bruger stier, der er forbundet med punkter, til at tegne en rektangulær form. Ellipse-værktøjet bruger stier, der er forbundet med punkter, til at tegne en elliptisk form osv. Det er også, hvordan Photoshop's Type Tool fungerer, selvom Photoshop håndtag skriver lidt anderledes end det håndterer almindelige figurer, men alle typer i Photoshop er i det væsentlige lavet af stier. Faktisk kan du konvertere type til figurer, som derefter giver dig alle de samme sti-redigeringsmuligheder med den type, du får, når du arbejder med figurer.
Du har muligvis også hørt stier kaldet konturer, og det er en temmelig god beskrivelse af, hvad en sti er, eller i det mindste, hvad en sti kan være. Vi kan tegne en firkantet sti, og hvis vi ikke gør noget andet med det, som i vi ikke fylder det med en farve eller anvender et strejke på det, så er alt, hvad vi har, en grundlæggende kontur af en firkant. Samme med en cirkel eller enhver anden form, vi tegner. Selve stien er bare konturen af formen. Det er først, når vi gør noget med stien, som at udfylde den, anvende et strejke eller konvertere det til et valg, at stien faktisk bliver noget mere end en grundlæggende kontur.
Du kan vælge en hel sti vha. Værktøjet Valg af sti (også kendt som værktøjet "sort pil"), eller du kan vælge individuelle punkter eller sti- segmenter ved hjælp af Direct Selection Tool (værktøjet "hvid pil"). En sti "segment" eller "linjesegment", som det undertiden kaldes, er en hvilken som helst sti mellem to punkter. En rektangulær sti, for eksempel, vil være sammensat af fire punkter (et i hvert hjørne), og de individuelle stier, der forbinder punkterne sammen langs toppen, nederst, til venstre og højre for at skabe formen på rektanglet, er sti-segmenterne . Selve stien er kombinationen af alle de individuelle sti-segmenter, der udgør formen.
Det kan være lidt forvirrende, så lad os se, hvad jeg mener. Åbn et nyt dokument i Photoshop. Det betyder ikke noget, hvilken størrelse det er. Jeg vælger størrelsen 640x480 fra listen med forudindstillinger, men som sagt, det betyder ikke noget, hvilken størrelse du vælger. Vælg dit penværktøj fra paletten Værktøjer. Du kan også vælge Penneværktøjet blot ved at trykke på bogstavet P på dit tastatur.
De to penværktøjstilstande
Inden vi fortsætter, skal vi først sørge for, at vi arbejder med stier, og det er fordi penværktøjet faktisk har to forskellige tilstande, det kan arbejde i, og som standard bruger det det andet. Når penværktøjet er valgt, ser vi en gruppe på tre ikoner, hvis vi ser op i indstillingslinjen øverst på skærmen:

Indstillingslinjen i Photoshop viser gruppen af tre ikoner, der repræsenterer hver af de tre Pen Tool-tilstande.
Jeg ved, at jeg sagde, at der er to tilstande, som Pen-værktøjet kan arbejde i, og alligevel, som for at gøre tingene mere forvirrende, er der tre ikoner, men ikonet til højre, som er ikonet Fyld pixels, er nedtonet og ikke tilgængeligt, når du arbejder med penværktøjet. Det er kun tilgængeligt, når du arbejder med de forskellige formværktøjer, så der er virkelig kun to ikoner, vi har brug for at se på.
Ikonet til venstre er ikonet Formlag, også kendt som "ikke det, vi ønsker", og det er det, der er valgt som standard. Hvis vi skulle arbejde med penværktøjet med det valgte ikon, ville vi tegne figurer, ligesom hvis vi brugte et af de forskellige formværktøjer, bortset fra at i stedet for at tegne en foruddefineret form som et rektangel eller en ellipse, kunne tegne enhver form, vi ønskede. Som jeg sagde, det er ikke, hvad vi ønsker. Vi vil have ikonet ved siden af, stier-ikonet, så gå videre og klik på det for at vælge det:

Photoshop-tutorials: Klik på "Stier" -ikonet i indstillingslinjen for at arbejde med stier med penneværktøjet.
Når penværktøjet er valgt og stierikonet valgt i indstillingslinjen, skal du klikke en gang hvor som helst i dit dokument. Klik ikke og træk, bare klik. Når du gør det, tilføjer du et lille firkantet punkt. Jeg har forstørret det her:

Klik en gang inde i dokumentet med penværktøjet for at tilføje et punkt.
Dette første punkt, vi netop har tilføjet, er udgangspunktet for vores vej. Nu i øjeblikket har vi faktisk ikke en sti. Alt, hvad vi har, er et udgangspunkt. "Punktet" kaldes teknisk et anker- eller ankerpunkt, og det hedder det, fordi det forankrer stien på plads. Dette første punkt forankrer begyndelsen af stien til dette sted inde i dokumentet. Når vi tilføjer flere punkter, vil hver af dem forankre stien på plads på det sted.
Lad os tilføje et andet punkt. Klik et andet sted inde i dokumentet. Hvor som helst vil gøre. Jeg vil klikke et sted til højre for mit oprindelige punkt:

Photoshop-tutorials: Tilføj et andet ankerpunkt ved at klikke et andet sted inde i dokumentet.
Jeg har nu tilføjet et andet ankerpunkt, og se hvad der er sket. Jeg har nu en lige linje, der forbinder de to punkter sammen! Den lige linje er min vej. Som jeg nævnte tidligere, har vi brug for mindst to punkter for at oprette en sti, da vi er nødt til at vide, hvor stien starter, og hvor den ender, og nu hvor vi både har et start- og slutpunkt, var Photoshop i stand til at forbinde to punkter sammen, skaber vores vej.
Lad os tilføje et par flere punkter bare for sjov. Klik et par gange til på forskellige steder i dokumentet. Igen, ikke klik og træk, bare klik:
Tilføj flere punkter ved at klikke på forskellige steder i dokumentet.
På billedet ovenfor har jeg tilføjet syv flere ankerpunkter ved at klikke på forskellige steder med Pen Tool, og hver gang jeg tilføjede et, steg længden af min sti, fordi der blev tilføjet en ny sti "segment" mellem det forrige punkt og det nye punkt. Min sti består nu af ni ankerpunkter og otte sti-segmenter. Jeg kunne fortsætte med at klikke rundt i dokumentet for at tilføje flere ankerpunkter og sti-segmenter, men hvad jeg virkelig gerne vil gøre nu er at lukke min sti, så den danner en komplet form.
Lukker en sti
For at lukke en sti, skal vi blot klikke endnu en gang på vores oprindelige startpunkt. Når du holder musemarkøren hen over udgangspunktet, ser du en lille cirkel vises i nederste højre hjørne af penikonet:

En lille cirkel vises i nederste højre hjørne af penikonet, når du holder musepekeren hen over stiens første startpunkt.
Denne cirkel fortæller os, at vi er ved at komme "fuld cirkel" med vores sti og afslutte den, hvor den begyndte. For at lukke det skal du blot klikke direkte på startpunktet.
Vi kan se nedenfor, at min sti er blevet en lukket sti og nu er en grundlæggende kontur af en form:
Stien er nu lukket, afsluttes ved udgangspunktet og skaber en lukket sti.
Selvom denne sti blev tegnet bare for sjov som et eksempel på, hvordan man tegner en grundlæggende sti med Pen Tool, kan jeg nemt forvandle denne sti til et valg. Til dette har vi brug for Photoshop's palet, og vi ser på det næste.
At dreje en sti til et valg
Indtil videre har vi set på, hvad en sti er, og hvordan man tegner en grundlæggende sti med Photoshop's Pen Tool. Men hvordan skal du gøre ved at vælge et stykke fra stien?
Let! Der er et par måder at omdanne en sti til en markering på, inklusive en praktisk tastaturgenvej, men før vi ser på den hurtige måde, lad os se på den officielle måde. Den "officielle måde" involverer brug af Photoshop's Paths-palet, som du finder grupperet med lagpaletten og kanalen-paletten:
Photoshop's Paths Palette.
Ved første øjekast ser Paths-paletten meget lig Photoshop's Layer-palette, og Adobe gjorde det med vilje sådan, så du føler dig mere komfortabel med at bruge den. Vi kan se en miniature-forhåndsvisning af formen på den sti, vi lige har oprettet, og som standard navngiver Photoshop stien "Work Path", som dybest set er en fin måde at sige "midlertidig" på, som om du skulle oprette en anden sti nu uden først at omdøbe denne sti til noget andet, denne ville blive erstattet af den nye sti. Du kan kun have en "Work Path", så hvis du vil beholde den, skal du dobbeltklikke på dens navn i Paths-paletten og navngive den til noget andet, før du opretter en ny sti.
Da min sti ligner en krone, skal jeg dobbeltklikke på navnet "Arbejdssti", som med Photoshop's dialogboks Gem sti vises, og jeg vil omdøbe min sti "Krone":

Du kan gemme en midlertidig "Work Path" ved blot at omdøbe den.
Jeg skal klikke på OK, når jeg er færdig, og nu, hvis jeg ser på min sti-palet igen, kan jeg se det nok, min "Arbejdspad" er blevet omdøbt til "Crown":
Paths-paletten, der viser, at stien er blevet omdøbt til "Crown".
Ved at omdøbe den, gemmes stien nu og forsvinder ikke på mig, hvis jeg går til at oprette en ny sti. Eventuelle gemte stier gemmes også med Photoshop-dokumentet, så nu, hvis jeg gemmer mit dokument, gemmes stien med det, og næste gang jeg åbner dokumentet, vil stien stadig være der i Paths-paletten.
Gemning af en sti er ikke noget, du skal gøre for at gøre den til et valg. I de fleste tilfælde, når du bruger penværktøjet til at foretage valg, behøver du ikke noget behov for stien, når du har foretaget et valg fra den, så der er ikke behov for at gemme den. Hvis du dog gerne ville gemme det, skal du bare omdøbe det til noget andet end "Arbejdssti", og det er gemt.
For at ændre stien til et valg, hvis vi ser på bunden af Paths-paletten, kan vi se flere ikoner. Disse ikoner tillader os at gøre forskellige ting med vores vej. Det første ikon til venstre er Udfyld sti med forgrundsfarveikon, og som navnet antyder, hvis du klikker på det, udfylder vores sti med vores nuværende forgrundsfarve. Interessant, men det er ikke det, vi ønsker. Det andet ikon fra venstre er Stroke-stien med børste-ikonet, som vil anvende et strejke på vores sti ved hjælp af hvilken pensel vi i øjeblikket har valgt.
Dette er en fantastisk måde at skabe interessante effekter i Photoshop, men for det, vi laver her, ved at gøre en sti til et valg, er det heller ikke det, vi ønsker. Det, vi ønsker, er det tredje ikon fra venstre, indlæsningsstien som et markeringsikon:
Ikonet "Indlæs sti som et valg" nederst på paletten Paths.
Så snart jeg klikker på dette ikon, bliver min sti i mit dokument et valg, som om jeg havde oprettet det ved hjælp af et af Photoshop's mere almindelige markeringsværktøjer:
Stien er nu konverteret til et valg.
Det er så let! Faktisk er det endnu nemmere end det, fordi der er en tastaturgenvej til at omdanne en sti til et valg uden at skulle skifte til Paths-paletten overhovedet. Når du har tegnet din sti, og du er klar til at omdanne den til et valg, skal du blot trykke på Ctrl + Enter (Win) / Command + Return (Mac) for at få Photoshop til at konvertere stien til et valg.
På nuværende tidspunkt kan det være lidt mere indlysende for dig, selvom Pen-værktøjet meget er et markeringsværktøj, det ikke er samlet i de andre markeringsværktøjer øverst på værktøjspaletten. Årsagen er, at penneværktøjet primært er et sti-værktøj. Det opretter markeringer ved først at oprette stier, og af den grund har det mere til fælles med de forskellige formværktøjer og type-værktøjet, som alle bruger stier end det har med de grundlæggende markeringsværktøjer som det rektangulære markeringsværktøj eller Lasso Værktøj, der kun foretager valg baseret på pixels.
Lad os se på et praktisk eksempel på, hvad vi har lært indtil videre. Her har vi et foto af et stopskilt foran nogle klippeklipper:

Et foto af et stopskilt.
Lad os sige, at jeg ville vælge det stopskilte, så jeg kan kopiere det til sit eget lag. Stopskiltet består af kun andet end en række lige linjer, hvilket vil gøre dette ekstremt let. Først har jeg brug for et udgangspunkt for min sti, så jeg starter i øverste venstre hjørne af skiltet ved at klikke en gang for at placere et indledende ankerpunkt. I dette tilfælde betyder det ikke rigtig, hvor jeg starter stien, men jeg starter i øverste venstre hjørne:
Klik en gang i øverste venstre hjørne af stopskiltet for at begynde stien med et første ankerpunkt.
Bemærk, hvordan jeg er zoomet ind her, når jeg klikker. Du finder det lettere, når du foretager valg med penværktøjet for at zoome ind lidt på dit billede. På den måde kan du være sikker på, at du holder din vej lige inden for det område, du vil vælge.
Lige nu har jeg ikke en sti, jeg har bare et udgangspunkt for min sti. For at oprette stien er alt, hvad jeg skal gøre, at gå omkring skiltet og tilføje et ankerpunkt i hvert hjørne, hvor stien skal ændre retning. Når jeg tilføjer hvert ankerpunkt, vises et nyt sti-segment, der forbinder det forrige ankerpunkt med det nye, indtil jeg er gået hele vejen rundt om skiltet. For at lukke stien skal jeg blot klikke tilbage på det oprindelige startpunkt. Det er lidt svært at se i skærmbilledet nedenfor, men jeg har nu en sti omkring hele stopskiltet, inklusive det indlæg, det er knyttet til, blot ved at gå rundt ved at klikke i hjørnerne, hvor stien skal ændre retning:

En sti vises nu rundt om stopskiltet på billedet.
Hvis jeg ser på min sti-palet nu, kan jeg meget tydeligt se, at jeg har en sti i form af stopskiltet:
Photoshop's Paths-palet, der viser stien tegnet rundt om stopskiltet.
Bemærk, hvordan Photoshop har navngivet stien "Work Path", hvilket betyder, at denne sti er midlertidig, og jeg mister den, hvis jeg opretter en anden sti uden at gemme denne først ved at omdøbe den. Selv hvis jeg ikke opretter en ny sti, mister jeg den stadig, når jeg lukker ud af dokumentet, medmindre jeg gemmer det først. Jeg har dog ikke behov for at gemme denne sti, så jeg skal ikke bekymre mig om den. I de fleste tilfælde behøver du heller ikke bekymre dig om det.
For at konvertere min sti til et valg skal jeg klikke på Load path som et markeringsikon i bunden af lagpaletten, eller jeg kunne lige så let trykke på Ctrl + Enter (Win) / Command + Return (Mac):
Klik på ikonet "Indlæs sti som et valg" i paletten Stier, eller tryk på "Ctrl + Enter" (Win) / "Kommando + Slet" (Mac) for at konvertere stien til et valg.
Så snart jeg gør det, konverteres min sti til et valg, og stopskiltet er nu valgt:

Stopskiltet vælges nu efter konvertering af stien til et valg.
Jeg skifter tilbage til min lagpalette, og for at kopiere stopskiltet på sit eget lag, bruger jeg tastaturgenvejen Ctrl + J (Win) / Command + J (Mac), der placerer tegnet på egen hånd lag over baggrundslaget:
Stopskiltet er nu kopieret til sit eget separate lag.
Med skiltet nu på sit eget lag, kan jeg gøre hvad jeg vil med det, bytte baggrunden med et andet billede eller gøre baggrunden sort / hvid, mens jeg efterlader tegnet i farve, hvad jeg kan tænke på. Pointen er, at jeg let kunne vælge tegnet ved at klikke i hjørnerne med Pen Tool, som skabte en sti omkring skiltet, og så konverterede jeg simpelthen stien til et valg.
Indtil videre i vores kig på valg af pen med værktøjet Pen i Photoshop, har vi lært, at pennen hver især er et markeringsværktøj som Photoshop's mere almindelige markeringsværktøjer som den rektangulære markering og Lasso værktøjer, men at i stedet for at foretage valg baseret på pixels, som disse andre værktøjer gør, tegner penværktøjet stier, som derefter let kan konverteres til valg, enten fra Paths-paletten eller ved hjælp af den hurtige tastaturgenvej.
Derfor findes pennen ikke øverst på værktøjspaletten med de andre pixelbaserede markeringsværktøjer, men er i stedet grupperet med sti-værktøjer, ligesom de forskellige formværktøjer, type-værktøjet og værktøjet til valg af sti og direkte valg . Penneværktøjet handler om stier, ikke pixels.
Vi har lært, at vi kan tilføje ankerpunkter i vores dokument, som forankrer stien på plads ved blot at klikke på forskellige steder med Pen Tool, og når vi tilføjer flere og flere ankerpunkter, opretter vi en sti som hvert nyt punkt er forbundet til det forrige punkt ved et nyt sti-segment. Vi har også lært, at en sti er det, der typisk kaldes et "ikke-udskrivningselement", hvilket betyder, at uanset hvor mange stier vi tilføjer, er ingen af dem synlige på papiret, når vi går til at udskrive billedet . De vil heller ikke være synlige, hvis vi viser billedet på et websted. Stier er kun synlige for os, når du arbejder i Photoshop (selvom andre programmer som Adobe Illustrator også understøtter stier). Det er først, når vi gør noget med stien, som at fylde den med en farve, anvende et strejke på den eller konvertere den til et valg, at stien bliver noget mere end bare en grundlæggende, ikke-udskrivende kontur af en form.
Vi så, hvor let det ville være at bruge penværktøjet til at vælge noget som et stopskilt ved at skitsere det med en sti, der består af en række lige sti-segmenter og derefter omdanne stien til et valg. Det er fantastisk, men virkelig har vi endnu ikke gjort noget, som vi ikke kunne have gjort lettere med noget som Lasso Tool, eller endnu bedre, Polygonal Lasso Tool, som blev bygget specifikt til at vælge fladsidede figurer som vores stop skilt. Chancerne er, medmindre du har en vis mærkelig fascination af vejskilte, før eller senere vil du vælge noget lidt mere interessant, og med "interessant" mener jeg mere udfordrende. Og med "udfordrende" mener jeg noget, der indeholder kurver. Valg af et buet objekt i Photoshop er normalt, når du finder dig selv at miste al respekt for de grundlæggende markeringsværktøjer. Heldigvis er det også tilfældet tidspunktet, hvor penværktøjet virkelig skinner!
Inden vi fortsætter, skal jeg påpege, at alt hvad vi har gjort op til dette punkt, har været temmelig enkelt. Klik her, klik der, konverter stien til et markeret udført. Denne næste del, hvor vi kommer ind i tegning af kurver, er ikke lige så enkel, selvom det bestemt ikke er svært, men hvis dette er din første gang med Pen Tool, eller du ikke har meget erfaring med det, kan det at virke med kurver synes lidt unaturlig og endda lidt overvældende. Det er bestemt her, at "ride på cykel" -analogien kommer ind. Du falder måske et par gange i starten og spekulerer på, hvordan nogen formår at gøre det, men jo mere du træner, og jo mere du holder dig med det, desto mere fornemt er det begynder at lave. På ingen tid overhovedet vil det virke som en anden natur for dig, og du vil pludselig forstå, hvorfor så mange mennesker sværger, at Pen Tool er det største valg af værktøj i hele Photoshop! Alvorligt er det virkelig.
At få et håndtag i retning af håndtag
Lad os starte med Pen Tool. Åbn et nyt tomt Photoshop-dokument, eller slet blot det, du har gjort hidtil i det eksisterende dokument, så vi begynder på ny. Når penværktøjet er valgt og indstillingen Stier valgt i indstillingslinjen (husk, at det er standardindstillingen til formen lag, så du skal sikre dig, at du har valgt indstillingen Stier), skal du klikke en gang hvor som helst i dit dokument, ligesom det gjorde vi før. Men denne gang, snarere end blot at klikke for at tilføje et ankerpunkt, skal du klikke og derefter trække din mus en kort afstand væk fra ankerpunktet, før du slipper museknappen:
Klik hvor som helst inde i dokumentet med penværktøjet, og træk derefter en kort afstand væk fra ankerpunktet.
Når du er færdig, vil du se et ankerpunkt med to linjer, der strækker sig ud fra det. Ved første øjekast kan du måske tro, at vi på en eller anden måde har formået at trække en sti ud med Pen Tool. Når alt kommer til alt ser det ud til, at vi har tre ankerpunkter, et i hver ende og et i midten, med to sti-segmenter, der forbinder dem. Hvis vi dog ser lidt nærmere på, kan vi se, at punkterne i begge ender er lidt mindre end det i midten, og at de faktisk har en anden form. Den i midten er firkantet, og som vi har set, er et ankerpunkt kvadratisk, men dem i begge ender ser ud til at være diamantformet. Er nogle ankerpunkter firkantede og nogle diamantformede?
Nix. Alle ankerpunkter er firkantede, og de er alle i samme størrelse, hvilket betyder, at de mindre, diamantformede punkter på enderne ikke er ankerpunkter. Og hvis de ikke er ankerpunkter, betyder det, at linjerne ikke er sti-segmenter, da vi har brug for mindst to ankerpunkter for at oprette en sti, og lige nu er det eneste ankerpunkt, vi har, det i midten. Så hvad er de linjer, der strækker sig ud fra ankerpunktet? Det er retningshåndtag!
"Ah, retning håndterer!" du siger. "Nu forstår jeg det!"
… … …………….
”Vent, nej, det gør jeg ikke. Hvad pokker er retningshåndtag?”
Retningshåndtag er, ja, håndtag, og de bruges kun, når du opretter buede stiensegmenter. Der er ikke behov for retningsgreb, når du opretter segmenter med lige sti. Der er normalt to af dem, selvom der undertiden kun er én, og som vi allerede har set, strækker de sig ud fra ankerpunkter. De kaldes "håndtag", fordi du, som vi ser i et øjeblik, faktisk kan gribe dem og flytte dem rundt.
Retningshåndtag kontrollerer to ting. De styrer kurvens vinkel, og de styrer længden på kurven, og de gør det på en rigtig pæn måde. Årsagen til, at der normalt er to af dem, er fordi den ene af dem styrer vinklen og længden af kurven, der kommer ind i ankerpunktet, og den anden styrer vinklen og længden på kurven, der strømmer ud fra ankerpunktet.
Før vi ser på, hvordan man tegner kurver med retningshåndtagene, lad os først se, hvordan vi styrer selve håndtagene, da vores succes med at tegne kurver vil afhænge meget af vores evne til at kontrollere håndtagene. Bare rolig, det er ikke, som de siger, raketvidenskab. Der er bare et par enkle ting, du har brug for at lære. Vi har allerede set, hvordan man opretter retningshåndtag ved at klikke med penværktøjet og derefter trække væk fra ankerpunktet. Jo længere væk fra ankerpunktet, vi trækker, jo længere bliver retningshåndtagene. Jo længere grebet er, jo længere er kurven. Kort håndtag, kort kurve. Langt håndtag, lang kurve.
En af de dejlige ting, du lærer ganske hurtigt om Pen Tool er, at det er ekstremt tilgivende. Der er overhovedet ingen grund til at bekymre dig om at få tingene rigtige, når vi tegner stier med det, fordi vi kan gå tilbage og ordne tingene let, når vi er færdige! Placerede du et ankerpunkt på det forkerte sted? Intet problem! Bare flyt det, hvor du har brug for det! Vi får se, hvordan vi gør det på et øjeblik. Trækkede du et retningsgreb i den forkerte retning? Ikke et problem. Grib håndtaget og drej det i den retning, du har brug for. Igen vil vi se, hvordan vi gør det. Er en af dine retningsgreb for lang eller for kort? Intet problem. Bare klik på det og træk det derefter længere eller kortere efter behov (jep, vi skal også se, hvordan vi gør det). Stier er fuldt redigerbare på alle tidspunkter, så der er absolut ingen grund til at bekymre sig om at begå en fejl eller få det rigtigt første gang. Får det ikke dig til at føle dig lidt bedre allerede?
Roterende og ændre størrelse på retningshåndtag
Som jeg nævnte kaldes de retning "håndtag", fordi du kan gribe dem som håndtag og bevæge dem rundt. Lad os se, hvordan vi gør det. Først skal vi se på, hvordan man drejer begge håndtag på samme tid. Ved hjælp af ankerpunktet og de to retningsgreb, vi allerede har oprettet, skal du holde Ctrl (Win) / Command (Mac) -tasten nede. Du vil se dit Pen Tool-ikon midlertidigt forvandle sig til Direct Selection Tool (den hvide pil) -ikon, og det er fordi, når Pen Tool er valgt, bliver "Ctrl / Command" en hurtig genvej til midlertidigt at få adgang til Direct Selection Tool, som er hvad vi bruger til at vælge forskellige dele af vores vej. Klik derefter blot direkte på den lille diamantform i slutningen af et af retningshåndtagene (klikke på selve "linjen" fungerer ikke, så du skal altid klikke på diamantformen i slutningen af et håndtag for at gøre noget med det) og træk det omkring ankerpunktet for at rotere det. Når du drejer et af håndtagene, drejer det andet håndtag sammen med det i modsat retning, ligesom en savsag. Du kan også bemærke, at så snart du begynder at trække håndtaget, ændres dit musemarkørikon igen, denne gang til ikonet Flyt værktøj, da vi flytter noget fra et sted til et andet:
Hold "Ctrl" (Win) / "Command" (Mac) nede, og klik på slutningen af et af retningens håndtag, og træk derefter i håndtaget for at dreje det omkring ankerpunktet. Når du trækker det ene håndtag, drejer det andet i den modsatte retning.
Du kan frigive din "Ctrl / Kommando" -tast, når du er begyndt at trække i håndtaget. Ingen grund til at holde det nede hele tiden.
For at ændre størrelsen på et retningshåndtag, mens du roterer det, skal du blot trække enden af håndtaget ind mod ankerpunktet for at gøre det kortere eller trække det væk fra ankerpunktet for at gøre det længere. Som jeg nævnte ovenfor, vil et kortere håndtag gøre kurven kortere, og et længere håndtag vil gøre kurven længere. Du kan dog ikke ændre størrelsen på begge håndtag på samme tid, så hvis du har brug for at ændre størrelsen på begge, skal du trække dem længere eller kortere separat. Det eneste, du kan gøre for dem begge på samme tid, er at dreje dem. Hvis du allerede har frigivet din museknap efter at have drejet håndtagene, og markøren er ændret tilbage til ikonet Pen værktøj, og du skal ændre størrelsen på et af håndtagene, skal du holde "Ctrl / Command" nede igen for at midlertidigt skift tilbage til Direct Selection Tool og klik derefter og træk i slutningen af håndtaget for at ændre størrelsen på det:
Træk enderne af håndtagene ind mod ankerpunktet for at forkorte dem, eller træk dem væk fra ankerpunktet for at gøre dem længere.
Lad os nu se, hvordan man drejer håndtagene uafhængigt af hinanden. To rotate one handle without affecting the other one, first release your mouse button if you've been rotating or resizing the handles so your cursor changes back into the Pen Tool icon. Then, instead of holding down "Ctrl/Command", which moves both handles at once, hold down your Alt (Win) / Option (Mac) key and click on the end of either of the direction handles. You'll see your cursor change into the Convert Point Tool icon, which looks like a simplified arrow made of only two lines, almost like an upside down letter "v" (except that it's not quite upside down). Then, simply drag the handle around the anchor point to rotate it, just as you did before, and this time, the handle will rotate independently of the other one, breaking the connection between them:
Hold down "Alt" (Win) / "Option" (Mac) and click on the end of either of the direction handles, then drag the handle to rotate it around the anchor point independently of the other handle.
Again, you can release your "Alt/Option" key after you've started dragging. You don't have to hold it down the whole time.
You can also resize direction handles using the "Alt/Option" key in exactly the same way as you can with the "Ctrl/Command" key. If you're in the process of rotating a handle, simply drag it in towards the anchor point to make it shorter or away from the anchor point to make it longer. If you've already released your mouse button and your cursor is showing the Pen Tool icon again, you'll need to hold down "Alt/Option" once again, then click on the end of the handle and drag it to resize it.
Is there a difference between resizing the handles using "Ctrl/Command" and using "Alt/Option" to do it? Yes there is. If you haven't yet "broken the connection" between the handles by dragging one independently of the other, resizing a handle using "Ctrl/Command" will keep the handles connected together. It won't resize both handles at once, but it won't break the connection between them either so you'll still be able to rotate them together if you need to. If you resize a handle using "Alt/Option", you'll break the connection between the handles. Even if you don't rotate the handle as you're resizing it, the connection will still be broken.
What if you've broken the connection between the handles by rotating them using "Alt/Option" and then want to rotate them together again? Can you "rebuild the connection", so-to-speak, by selecting one of them while holding down "Ctrl/Command" as before? Good question, and the answer is no. Once you've broken the connection between the handles, the "Ctrl/Command" key on its own won't bring it back. You'll need to select one of the handles while holding Ctrl+Alt (Win) / Command+Option (Mac) at that point in order to move the handles together again.
Quick Summary So Far …
We've covered a lot of information here about working with direction handles, so before we move on and start drawing some actual curves, let's do a quick recap:
- To add an anchor point, simply click with the Pen Tool.
- To add an anchor point with direction handles extending out from it, click with the Pen Tool, then drag away from the anchor point before releasing your mouse button. The further you drag, the longer the direction handles will be.
- To rotate the direction handles together, hold down Ctrl (Win) / Command (Mac), which will temporarily switch you to the Direct Selection Tool, then click on the end of either handle and drag it around the anchor point. The other handle will rotate in the opposite direction.
- To rotate the direction handles independently, hold down Alt (Win) / Option (Mac), which will temporarily switch you to the Convert Point Tool, then click on the end of either handle and drag it around the anchor point. The other handle will not rotate.
- To resize handles without breaking the connection between them, hold down Ctrl (Win) / Command (Mac) to switch to the Direct Selection Tool, then click on the end of either handle. Drag it towards the anchor point to make it shorter, or drag it away from the anchor point to make it longer.
- To resize handles and break the connection between them, hold down Alt (Win) / Option (Mac) to switch to the Convert Point Tool, then click on the end of either handle. Drag it towards the anchor point to make it shorter, or drag it away from the anchor point to make it longer.
- To rotate the direction handles together after breaking the connection, hold down Ctrl+Alt (Win) / Command+Option (Mac), then click on the end of either handle and drag it around the anchor point. The other handle will once again rotate with it.
Okay, that pretty much covers the basics of how to control the direction handles. Let's see how we can use them to draw some curves!
We've covered a lot of ground so far. We know about anchor points and direction handles. We know that in order to draw straight path segments, all we need to do is lay down a series of anchor points wherever we need them simply by clicking with the Pen Tool, and as we add more and more anchor points, we add more straight sections to our path. We know how to create direction handles and how to rotate them, either together or separately, and how to resize them.
We know how to turn a path into a selection by clicking on the "Load path as selection" icon at the bottom of the Paths palette or by simply pressing "Ctrl+Enter" (Win) / "Command+Return" (Mac) on the keyboard. One thing I didn't mention yet is that regardless of whether our path consists of straight lines,
curves, or a combination of straight lines and curves, converting it into a selection is done exactly the same way, and we've already learned how to do it, which means we're well on our way to mastering making selections with the pen! All we need to do is get a bit of practice drawing curves, which is exactly what we're about to do!
Ruller du stadig? Download denne tutorial som en PDF!
Drawing A Curve
Let's once again start fresh, either by opening up a new blank document in Photoshop or by deleting what you've already done. We're going to draw our first curve so we can put all of our newly-aquired direction handle knowledge to use. First, with the Pen Tool selected and the Paths option selected in the Options Bar, click once somewhere in your document to add an anchor point. Just click, don't click and drag. You should have one single anchor point on the screen when you're done.
Then, move your mouse cursor up and to the right of your initial anchor point. Click again to add a second anchor point, but this time, drag your mouse a little to the right of the anchor point to drag out direction handles. Hold down Shift as you drag to constrain your movement to a horizontal direction. As you drag out the direction handles, you'll see your path appearing as a curve between the two anchor points! The further you drag your mouse, the longer you make the direction handles, and the more of a curve you create:
Click once to add an anchor point, then click and drag out a second anchor point with direction handles, creating a curved path segment between the two points.
Click down and to the right of the second anchor point to add a third anchor point. This time, don't click and drag, just click:
Add a third anchor point down and to the right of the second one by clicking with the Pen Tool.
As soon as you add the third anchor point, a second path segment will appear, joining the second anchor point with the third one. And because our second anchor point has direction handles extending from it, this new path segment is also curved! We now have a nice, smooth arc starting from the first point on the left, then passing through the anchor point with the direction handles up top, and coming to an end at the third point.
One thing you may have noticed, and you can see it in the screenshot above, is that when you added the third anchor point, the direction handle extending out the left side of the second anchor point disappeared. It's still there, Photoshop simply hid it from view. To see it again, use the keyboard shortcut we've already learned to temporarily switch to the Direct Selection Tool, which is by holding down the Ctrl (Win) / Command (Mac) key, and then click on the second anchor point to select it. As soon as you do, the missing direction handle reappears as if it was there the whole time (which it was):

Hold down the "Ctrl" (Win) / "Command" (Mac) key to temporarily switch to the Direct Selection Tool, then click on the top anchor point to select it. The missing anchor point reappears.
With your "Ctrl/Command" key still held down so you still have access to the Direct Selection Tool, try resizing each direction handle by clicking on the end of each one to select it and then dragging it towards and away from its anchor point. Again, hold "Shift" as you drag to constrain your movement horizontally, and watch what happens. As you increase the length of a handle, you get more of a curve, and as you decrease its length, you get less of a curve. Also notice that each handle controls its own side of the curve. The handle on the left controls the curve coming into the anchor point from the left, and the handle on the right controls the curve flowing out from the anchor point on the right.
Here, I've made my handle on the left shorter, and as we can see, there's much less of a curve now than there was originally, almost becoming a straight line. I've also made the handle on the right longer, and as a result, the curve on the right is now much more pronounced. The faint curve is the original for comparison:
Change the shape of the curves by resizing the direction handles. The left handle controls the left curve, and the right handle controls the right curve.
I'm going to undo my changes by pressing Ctrl+Alt+Z (Win) / Command+Option+Z (Mac) a couple of times to set my direction handles back to their original sizes so they're equal length once again. Now let's try rotating the handles. Hold down "Ctrl/Command" once again to access the Direct Selection Tool, then click on the end of either handle to select it and try rotating it around the anchor point. Since we selected the handle with "Ctrl/Command", both handles rotate together. Here I've dragged my left handle down and to the right, and the angle of the curve on the left changed along with it, now appearing as more of a slope as it rises up towards the anchor point. By dragging the left handle down and to the right, I caused the right handle to rotate up and to the left, and again, the angle of the curve on the right changed along with it, now rising above the anchor point briefly before making a steep decent down to the anchor point on the right. Again, the faint curve is the original for comparison:
Rotate the direction handles to change the angle of the curves. Select a handle while holding "Ctrl" (Win) / "Command" (Mac) to rotate both handles together.
The Dreaded "Loop"
One thing you want to avoid is rotating the handles too far, which will cause your path segments to overlap and create loops. Here, I've rotated my handles all the way around so that the left handle is now on the right and the right handle is on the left, and notice what's happened. My path segments are now overlapping each other, creating a loop:
Rotating the direction handles too far causes the path segments to overlap, creating an unwanted loop in the path.
Loops can be caused by rotating the direction handles too far, as I've done above, but more often than not, they're caused by a handle being too long, making the curve too long and causing it to overlap with itself. If that happens, which it does sometimes as you're drawing a path, simply shorten the length of the direction handle. Most people end up creating a whole bunch of loops in their path when they first start working with the Pen Tool, so don't think you're the only one. No need to panic or become frustrated though. As I said, the problem is most likely being caused by a direction handle being too long, and all you need to do is shorten the handle to "un loop" the loop!
I'm going to press Ctrl+Alt+Z (Win) / Command+Option+Z (Mac) a few times once again to undo my changes and reset my path back to the nice smooth arc I started with. Now, what about rotating the direction handles independently of each other? As we learned on the previous page, to rotate the handles separately, instead of selecting them with "Ctrl/Command", we simply select them while holding down Alt (Win) / Option (Mac), which gives us temporary access to the Convert Point Tool. Click on the end of a handle to select it, then drag it with your mouse to rotate it and this time, the other handle will stay in place, breaking the connection between them.
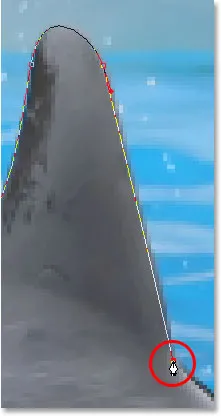
Here, I've selected the handle on the right while holding "Alt/Option" and then rotated it down and to the left. Notice how once again, the angle of the path segment on the right changes to match the new direction of the handle, and this time, the handle on the left, along with the path segment on the left, both stay in place. My path now looks a bit like a shark fin:
Hold down "Alt" (Win) / "Option" (Mac) to temporarily access the "Convert Point Tool", then click on the end of a direction handle to select it and rotate it independently of the other handle.
Moving An Anchor Point
One thing we haven't looked at yet is how to move an anchor point. If you recall, I mentioned on the previous page that the Pen Tool is extremely forgiving, and one of the reasons for it, besides being able to rotate and resize our direction handles after we've created them, is that we can easily move anchor points from one spot to another if we need to. As we've already learned, anchor points anchor a path into place. The anchor points themselves, however, are not anchored into place. You can move an anchor point anywhere, anytime, and any path segments that are connected to it will move and adjust right along with it.
To move an anchor point, hold down Ctrl (Win) / Command (Mac) to temporarily access the Direct Selection Tool as we've already been doing, then simply click on the anchor point to select it and drag it to its new location with your mouse. Any path segments connected to it will move with it to the new location. Here, I've dragged my middle anchor point down a bit from its original location (again, the faint path marks the original location for comparison). Notice how the path itself has changed shape to adjust to the new location of the anchor point:
Hold down "Ctrl" (Win) / "Command" (Mac) and click on an anchor point to select it, then drag it to a new location. Any path segments connected to the point will move with it, changing shape as needed.
Normally, when outlining an object with a path to select it using the Pen Tool, you won't need to move to an anchor point quite as far as what I've done above, but it's very common to go back around your path after you've created it and nudge a few anchor points here and there to fine-tune the path. Once you've selected an anchor point, you can nudge it up, down, left or right using the arrow keys on your keyboard.
Combining Straight Paths With Curves
What if I didn't want both of my path segments to be curves? What if what I needed was for the first path segment to be curved, but the second one needed to be straight? Let's see how to do that. I'm going to delete my existing path and start over again. First, I'll click to add an anchor point to start things off. Then, just as before, I'll click to add a second anchor point up and to the right of my initial point, and this time, I'll drag out direction handles, which will create a curved path connecting the two points, giving me exactly what I had way up at the start of this page:
Click once to add an anchor point, then click to add a second anchor point and drag out direction handles to create a curve.
I now have my initial curve, but I want my next path segment to be straight. If I was to simply click somewhere to add another anchor point right now, I would get another curve because I have that direction handle extending out from the right side of the last anchor point I added. What I need to do is get rid of that one direction handle. Without a direction handle controlling the angle and length of a curve, we get a straight line.
To remove the handle, leaving only the handle on the left of the anchor point, all I need to do is hold down Alt (Win) / Option (Mac), which will again temporarily switch me to the Convert Point Tool, and then I just click directly on the anchor point. When I do, the direction handle on the right disappears, leaving only the one on the left:
Hold down "Alt" (Win) / "Option" (Mac) and click directly on the anchor point to remove the direction handle on the right, leaving only the one on the left.
Now, with the direction handle gone, if I click to add a new anchor point, I get a straight path segment between the two points :
With the direction handle on the right now gone, clicking to add a new anchor point adds a straight path segment between the two points.
I now have a curved path segment on the left and a straight one on the right! What if I wanted the exact opposite? Suppose I needed to start with a straight path segment and then follow it with a curve? To do that, first I'll start by clicking to add an initial anchor point. Then, since I want a straight path segment, all I need to do is click somewhere else to add a second anchor point, and I automatically get a straight path connecting the two points:
Click with the Pen Tool to add an initial anchor point, then click again somewhere else to add a second anchor point and create a straight path segment between them.
I'm going to keep my mouse button held down after clicking to add my second anchor point because I want my next path segment to be curved, and we know that in order to create a curve, we need a direction handle. To add a handle extending out from the right of my anchor point, I'm going to hold down Alt (Win) / Option (Mac), and with my mouse button still down, I'm simply going to to drag to the right of the anchor point. As I do, a direction handle will drag out along with it:
Hold down "Alt" (Win) / "Option" (Mac) and drag out a direction handle on the right of the anchor point.
Notice that the direction handle extended only from the right of the anchor point, not from both sides, leaving my straight path segment on the left in place. And now that I have my direction handle on the right, all I need to do to create my curve is click to add a third point:
Click to add a third anchor point, which creates a curved path segment between the previous anchor point and the new one.
And there we go! I now have a straight path segment on the left, followed by a curved segment on the right. Of course, most paths you draw are going to consist of more than just three anchor points. Let's say I wanted to continue this path, moving in the same general direction towards the right, and I want my next path segment to be curved as well. Just as I did a moment ago, I would leave my mouse button held down after clicking to add my third point. I would hold down Alt (Win) / Option (Mac) and I would drag out another direction handle. So far, we've only been dragging handles out towards the right, but what you really want to do is drag your handles out in the general direction you want the curve to follow. I want to create a curve that goes up and to the right, so I'm going to drag out a small handle in that same general direction:
Drag out your direction handles in the general direction of the curve.
Tip! A good practice to get into is to keep your direction handles small when first dragging them out, since you never really know how long or at what exact angle they need to be until the actual curve appears, and the curve doesn't appear until you've added both of its anchor points. Once you've added both points and the curve appears, you can easily go back and make any adjustments you need to the handles. You may even want to wait until you've drawn the entire path before worrying about adjusting the handles.
With my direction handle created, I'm going to click to add a fourth anchor point, and I'm going to drag out direction handles from it as well:
Adding a fourth anchor point along with direction handles extending from it.
I now have a third segment added to my path, this one being a curve. Notice that this curve actually has two direction handles controlling it, one extending from the right of my third anchor point and one extending from the left of my fourth point:

The third path segment now has two direction handles, one on either end, working together to control the curve.
The overall shape of this curve is now being controlled by the length and direction of both of these handles. Watch what happens to the curve when I move the handles. I'll drag the bottom handle down and to the right, and I'll drag the top handle up and to the left. I'll also drag both of these handles longer. The faint curve is the original for comparison:
Changing the direction and/or length of either handle changes the overall shape of the curve. After rotating and lengthening both handles, the curve now appears in an "S" shape.
The curve is now a bit "S" shaped, and that's because the bottom handle is controlling the angle and length of the curve as it flows out from the third anchor point, while the top handle is controlling the angle and length of the curve as it flows into the fourth point. Changing the length and/or direction of either handle will change the overall shape of the curve.
I'm going to press Ctrl+Alt+Z (Win) / Command+Option+Z (Mac) a couple of times to undo the changes I made, so the curve is once again in a simple arc shape as it was a moment ago, and I think I'll finish off this path with another straight segment, which means I'll need to remove that direction handle extending out from the right side of the fourth anchor point. We've already learned how to do that, by holding down Alt (Win) / Option (Mac) and clicking directly on the anchor point itself:
Hold down "Alt" (Win) / "Option" (Mac) and click directly on the anchor point to remove the direction handle on the right.
With the direction handle gone, all I need to do now to add a straight path segment is click to add another anchor point:
The direction handle on the right is now gone, so we can add a straight path segment simply by clicking to add another anchor point.
We could continue this path for as long as we wanted, adding more straight segments and curves, but I think we'll stop here because we've pretty much covered everything we need to know about drawing paths with the Pen Tool at this point. That was a lot of information to take in, especially if this is your first time learning about paths. As I mentioned at the beginning, you won't become a Pen Master simply by reading through this tutorial, just as you won't learn how to ride a bike, or drive a car, learn to swim, or play the piano simply by reading about it. But hopefully you have some sense at this point of how to draw paths with the Pen Tool, how to draw straight path segments, how to draw curves by dragging out direction handles, how to change the length and angle of the curve by rotating and resizing the handles, and how to combine straight and curved segments in a path.
To finish off our look at making selections with the Pen Tool, let's see a practical example of how to select an object with curves.
Here, we have a photo of a couple of dolphins leaping out of the water. Definitely a couple of very curvy creatures:

A photo of two dolphins jumping out of the water.
Let's say we want to select these dolphins so we can use them for a design or a collage, or whatever the case may be. If you were to try selecting them with the Lasso Tool, which is most likely what you would end up using if you didn't know how to use the Pen Tool, not only would you have a tough time, you'd have an even tougher time trying to convince yourself that you were happy with the results when you were done. The reason is because the Lasso Tool simply isn't capable of making curved selections very well. The biggest problem with it, besides being a pixel-based selection tool, is that it relies on you having a steady enough hand to move it smoothly around the curves. Even if you don't suffer from a caffeine addiction, you could drive yourself crazy trying to draw a perfectly smooth curve with your mouse, or even with a pen tablet, and when you've finally given up, you'll still be left with a selection full of rough, jagged edges that just scream "amateur!". No one likes to be called an amateur, especially when there's no need for it thanks to the Pen Tool!
Examine The Object First
Whenever you're about to select something with the Pen Tool, before you begin, take a moment to examine the object carefully to get a sense of where you're going to need to place your anchor points. Forget about all the details in the object and focus only on its shape. Where are the areas where the shape changes direction? Which parts of the shape are straight? Which parts are curved? If there's a curve, is it a smooth, continuous arc or does the angle change at a spot along the curve? Visualize in your mind where you're going to need to place your anchor points, because when you place one, you always want to be thinking about the next one and what the path segment between the two points needs to look like.
A Tool Of Elegance
One more thing to keep in mind is that the Pen Tool is meant to be a tool of elegance . It's not a nail gun or a staple gun. You don't want to just go clicking around your shape adding anchor points all "willy nilly" (that's a technical term). When using it to draw curves, you want those curves to be nice and smooth, otherwise we might as well just stick with the Lasso Tool. To keep the curves flowing smoothly, we need to limit the number of anchor points we use to create them. That's why you want to take a moment to examine the object first and visualize where the anchor points need to be. If you can outline a large section of the shape using only one curve with an anchor point on either end, that's what you want to do, because that's what's going to give you the kind of results you're looking for. The kind of results that scream "definitely not an amateur!".
Let's select these dolphins. I'm going to start my path in the middle of the photo, at the spot where the side of the dolphin on the left overlaps the rear flipper of the dolphin on the right. There's no right or wrong place to begin a path. This is just where I've decided to start. The first part of that rear flipper is straight, so since I don't need a direction handle to create a straight path segment, I'm simply going to click once with my Pen Tool to add my first anchor point, which will serve as the starting point for my path:
Adding the first anchor point.
As I mentioned earlier, you'll probably find it helpful to zoom in on your image as you're drawing your path. To scroll the image around on the screen as you're zoomed in, hold down the spacebar, which will switch you temporarily to the Hand Tool and allow you to move the image around on the screen by clicking and dragging it.
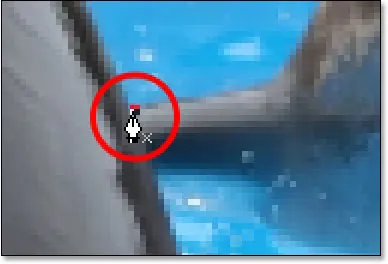
The top of that flipper actually has a slight curve to it as it approaches the dolphin's tail section, so for my second anchor point, I'm going to click at the point where the flipper and tail section meet, and I'm going to drag out short direction handles, dragging up and to the right in the direction that the tail section is moving. Notice that I've now created a slight curve along the flipper:
Adding the second anchor point and dragging out small direction handles to add a slight curve to the first path segment.
As I continue up along the tail, I can see that it stays straight for a short distance, followed by a curve to the right, so I'm going to click to add a third anchor point at the spot where the curve begins. This gives me a straight path segment between the previous point and the new one. I know there's a short direction handle extending out from the previous anchor point, which normally means that my new path segment will be a curve, not a straight section, but because the handle is so short and is also moving in the same direction as the path segment, there is no noticeable curve to it. Consider it a "mostly straight" path segment:
Clicking to add the third anchor point, creating a (mostly) straight path segment.
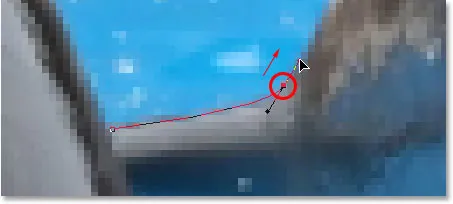
Continuing along, we come to the first real curve in our path. For this, I'm going to need to drag out a direction handle from the anchor point I just added, so I'm going to hold down Alt (Win) / Option (Mac), then drag out a handle in the general direction where I want the curve to flow as it starts. Notice how I'm only dragging out a handle from the one side of the anchor point, not both:
Hold "Alt" (Win) / "Option" (Mac) to drag out a direction handle from one side of an anchor point.
To add the curve, I'll click and drag at the spot where the curve ends, shaping the curve as I drag out the handles until it matches the curve of the dolphin's tail. If I needed to, I could also go back and change the length and direction of the handle at the start of the curve to fine-tune it, but in this case, I don't need to do that:
Adding an anchor point at the opposite end of the curve and dragging out direction handles from it, rotating and resizing them as needed until the curve matches the curve of the object.
The next area of the dolphin is pretty straight, right up until its back begins to merge with its dorsal fin, at which point there's another curve, so I'm going to click to add an anchor point just before the curve up the dorsal fin begins, which is going to give me another "mostly straight" path segment between the previous point and the new point. Then I'm going to once again hold down Alt (Win) / Option (Mac) and drag out a direction handle as I prepare for my next path segment which will be curved:
Click to add an anchor point, then hold down "Alt" (Win) / "Option" (Mac) and drag out a direction handle to prepare for the next path segment.
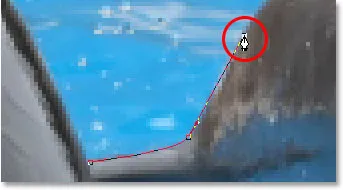
The left side of the dorsal fin consists mainly of one continuous curve upward until it gets near the very top, at which point the shape changes, so to create this curve, I'm going to click and drag at the point near the top where the curve will change direction. As we can see in the screenshot, this adds a curved path segment between the previous anchor point and the new one, but the curve is not yet following along the shape of the fin. It's going to need some fine-tuning:
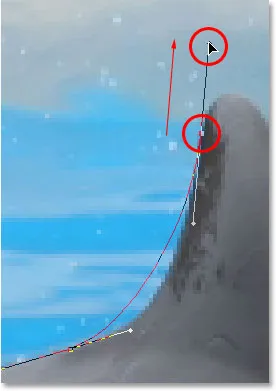
Adding a curve along the left side of the dorsal fin. The curve still needs some adjusting.
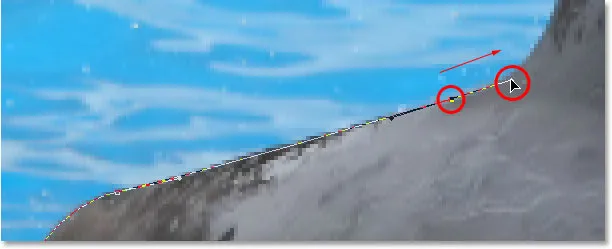
To adjust the curve, I'm simply going to hold down the Ctrl (Win) / Command (Mac) key, which gives me temporary access to the Direct Selection Tool, and I'm going to drag the handle extending out from the bottom anchor point towards the right to lengthen it, which is going to pull the angle of the curve in towards the right along with it, lining it up nicely with the curve of the fin. I've also rotated the top direction handles slightly in a clockwise direction just to be nit-picky, but the majority of the adjustment was done using the bottom direction handle:
Adjust the curve by adjusting its direction handles.
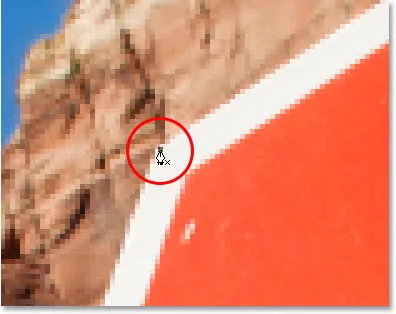
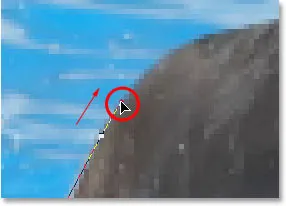
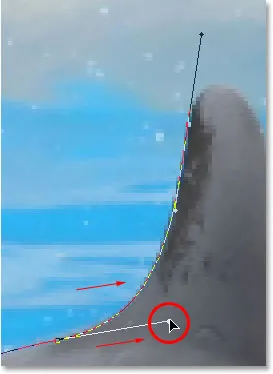
To add a curve around the top of the fin, I'll click and drag on the opposite side of it to add another anchor point with short direction handles. Notice though that we run into a bit of a problem. The direction handle on the left side of the curve is too long and it's pulling the curve away from the top of the fin:
The direction handle on the left of the curve is too long, resulting in the curve not following the shape of the fin.
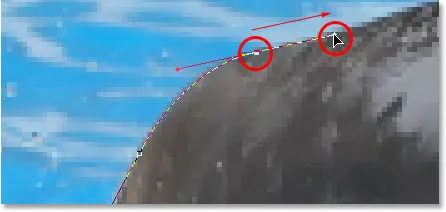
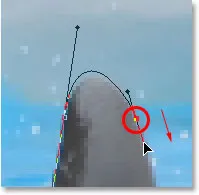
To fix that, all I need to do is once again hold down Ctrl (Win) / Command (Mac), then click on the end of the handle to select it and drag it shorter until the curve is the proper shape:
Shortening the length of the direction handle to adjust the shape of the curve.
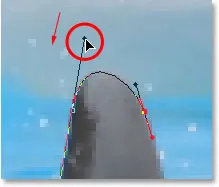
Let's finish creating our path around the dorsal fin. The remainder of the fin is basically a straight line, so I'm going to click at the base of the fin to add another anchor point which adds the straight path segment, completing our path around the fin:
Adding an anchor point at the base of the fin to finish drawing the path around it.
Since you and I would both be here all day if I was to continue commenting on every anchor point, direction handle and path segment as we make our way slowly around the dolphins, and since we've covered everything we need to know at this point, I'm going to go ahead and draw the rest of the path, outlining both dolphins:
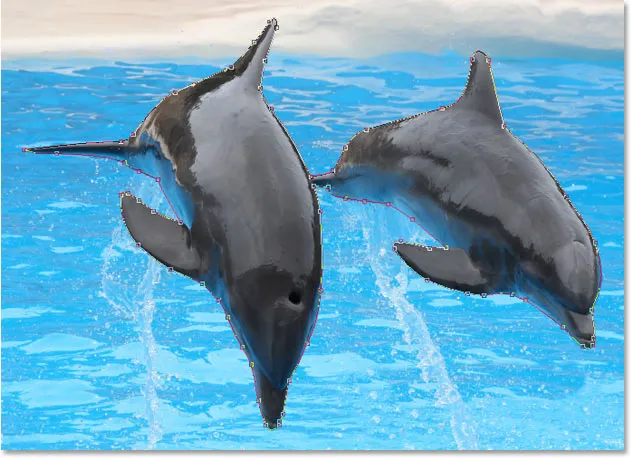
Both dolphins are now outlined by the path.
The dolphins have now been outlined with the path, and if we look at the Paths palette, we can see that sure enough, we have a path in the shape of the dolphins:
Photoshop's Paths palette showing the outline of the dolphins in the preview thumbnail.
As we've learned, Photoshop automatically names the path "Work Path", which means it's temporary and will be replaced if we start a new path. If you wanted to save it, you would need to double-click on the name "Work Path" and rename it to something else, like "Dolphins" in this case. I'm not going to worry about that, since I have no need to save it. All I want to do at this point is convert my path into a selection, and since I'm already in the Paths palette, I'll do that by clicking on the Load path as selection icon at the bottom of the palette:
Clicking the "Load path as selection" icon at the bottom of the Paths palette.
I could also have used the keyboard shortcut Ctrl+Enter (Win) / Command+Return (Mac) . Either way converts my path into a selection, and if I look at my photo, I can see that my path has indeed become a selection around the dolphins:

The path around the dolphins has now been converted into a selection.
Hvor skal jeg hen næste …
Og der har vi det! The dolphins are now selected and ready for whatever plans we have for them. And with that, we wrap up our look at drawing paths and making selections with the Pen Tool in Photoshop! For mere om Photoshop's valgværktøjer, se vores Sådan foretages valg i Photoshop-serien. Besøg vores Photoshop Basics-afsnit for flere Photoshop-emner!